Introduction
This page describes a power supply for AC synchronous motors as used in many turntables - in my case an original Rega 2. The idea of the construction is to provide an electronic speed control, as it is a pain to change the speed of the Rega (lift off the platter and platter mat, move the belt, refit the platter and finally the mat). Using the TTPSU you can change speed electronically.
Another feature is the speed adjustment: The original Rega's was known for precise 33 RPM, but the 45 RPM was a little off speed. Using the TTPSU the 45 RPM speed can be adjusted individually of the 33 RPM.
Features
The power supply descriped here, is for turntables with 2 phase AC motor, like Linn, Rega, AR, Heybrook, Goldring and many, many more. The main features of the power supply are:
-
X-tal controlled speed. The TTPSU can change speed by the push of a button - no need to move the belt on the pulley.
-
Speed selection - 2 to 4 speeds can be configured and adjusted.
-
Speed adjustment by varying the AC frequency in 0.1% steps.
-
Approx. 15W output capability.
-
DC free AC output. Also, spikes and noise on the net is eliminated.
-
Optional lowering of the operating speed after start-up (110V->85V, 230>170V). High voltage output time can be set to 10, 25 seconds or always. A lower operating speed reduces the vibrations from the motor.
-
Speed ramping to allow speed changes with the pickup in the groove with a minimum of vibrations and "soft" startup.
-
3 button control.
-
16x1 LCD display.
-
Microprocessor controlled "Sinus" generation.
-
Optional 50/60Hz input.
-
Build for 110V or 230V input, 110V/230V output.
-
Optional 50Hz/60Hz ouput (by downloading the appropriate program to the processor).
-
Optional cleaner sinus for 60Hz operation (download) by overclocking the processor.
-
It's relatively cheap to build!
Warning - Important note!
This project is connected to 220V-240V mains supply alternatively the 110V-130V mains supply and is potentially lethal. Futhermore, it proceduces lethal output voltages (again 110V-130V/220V-240V). As a result of this, please observe the following:
-
Do NOT build this project unless you are completely familiar with mains wiring practices.
-
The circuit MUST be built into a fully enclosed case - if at all in doubt, please use an isolating plastic enclosure.
-
Do NOT touch anything inside the case, when the curcuit when it is powered (even if turned off).
The PCB does not carry any dangerous voltages, but it is all to easy to touch anything carrying lethal voltages (mains input, transformer connectors, fuse wires, mains switch connectors etc.).
Quick links
Input transformer/Power supply
Microprocessor controlled sinus generator, the DAC and filter
Gain stage and power amplifier
Notes about XTAL selection and PCB parts
Mounting the construction in an enclosure
Possible improvements in a future v2 of the TTPSU
Construction details
Here's a run down of the idea behind the TTPSU and some reasons for selecting the individual components:
-
PIC16F870 or PIC16F883 processor with resistor DAC for Sinus generation.
-
Filtered sinus to make the sinus cleaner (less distortion).
-
Class (A)B power amplifier.
-
Stabilized power supply for the microcontroller and amplifier circuits.
-
Transformer step-up for generating 110/230V output.
-
Fuse protected output for overload protection.
The Microchip PIC16F870 was originally selected for several reasons. First of all, a Microchip processor was selected as I have both a selection of PIC's and the development tools needed. The selection of 16F870 was based on the need for an external crystal for maximum speed stability and precision, the need 6 outputs for the DAC (port B<0:5>), 3 inputs for input control (port A<0:2>), 1 input/output for reduced operating voltage (port A<3>) and 6 outputs for display control (port C<0:1,3:5>). For a total of 16 I/O pins, the closest processor I had, was the 16F870. These days (2012/2013) the 16F870 has become more difficult (and expensive) to obtain, so I have added the option of using a 16F883 as well - just download the appropriate software for the selected processor.
The resistor DAC was selected for the following reasons: It's cheap! It uses 7 standard 5% E12 resistor values (measure for optimal precision) or alternatively 7 1% E96 resistor values. I figured I could get a reasonable sinus precision compared to low-cost external DAC's, and a 6 step DAC was what was needed, due to the idea behind the speed regulation. Permitting the use of 7 standard E12 resistors, makes it possible to build the TTPSU from components "in the drawer" and updating the DAC with 1% resistors, if the construction suits you needs.
The class B output power amplifier was selected for these reasons: It's simple - a class (A)B output stage based on an op amp with only a few external components. This is the absolutely worst amplifier you can build for audio purposes, but it measures very well on sinus signals (which is what we use it for) and it's cheap.
The stabilized power supply was added to the design to make sure, that net noise and net spikes was filtered out from the output. A input net filter was added for good measure.
The fuse protection in the output (essential!!!) was added, so if somebody got the "good" idea of plugging in an amplifier or vacuum cleaner :-), the TTPSU does not blow up in smoke. The fuse should be a slow fuse, as the TTPSU, although rated at 15W, is able to deliver in excess of 20W for short periods. Also, I recommend you use as small a fuse as you can get away with (i.e. the turntable starts up at every speed without blowing the fuse) - this will make the fuse blow, if the turntable is somehow obstructed and protect the motor.
Block diagram
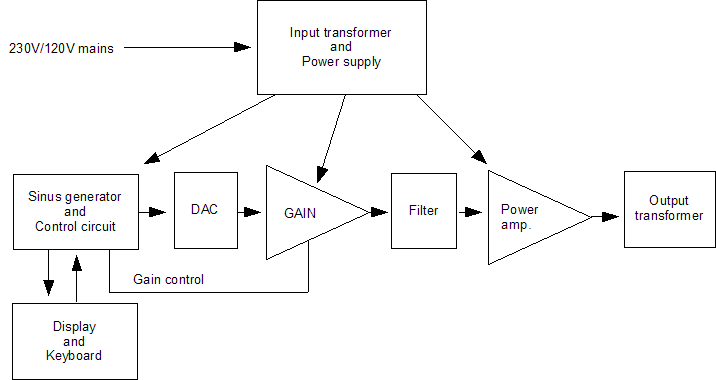
The concept behind the TTPSU is as follows: We take the mains input and transform it down to +/-15V and 5V for the microcontroller. The microcontroller and DAC (with filter) generates an approximate sinus signal, which is amplified and sent to the power amplifier. Finally, the output from the power amplifer is sent through the output transformer to generate the 120V/230V output. The microcontroller also handles the control buttons and the display.
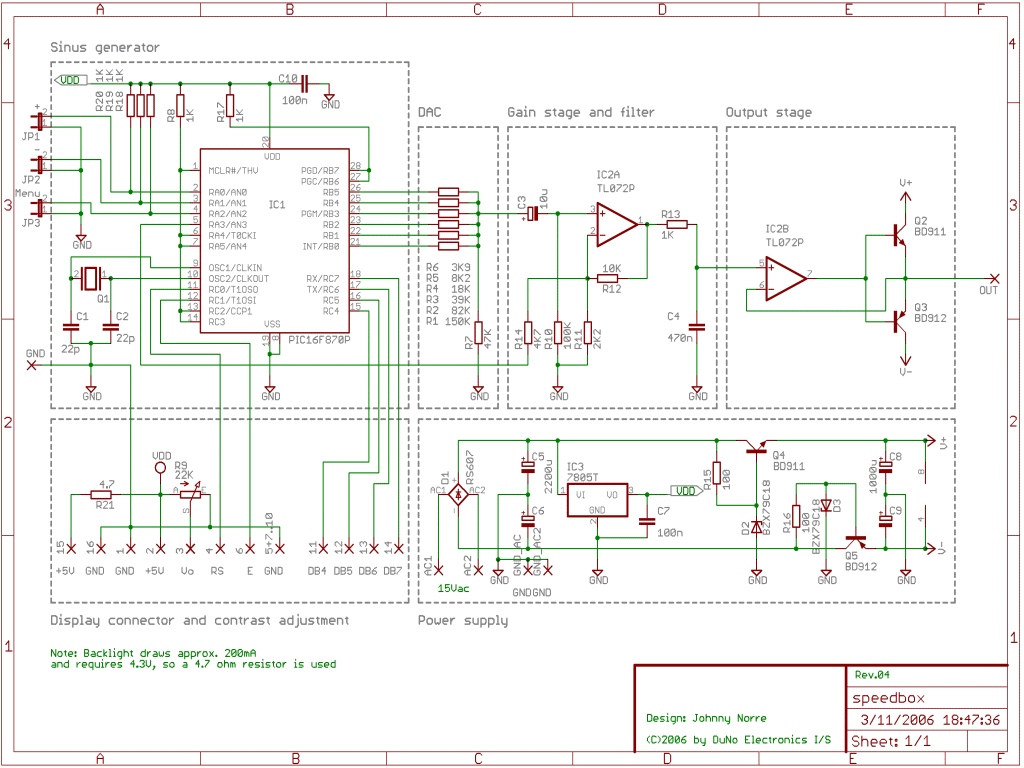
Input transformer/Power supply
The input transformer is 120V or 230V primary and 2x15V secondary. The AC input is sent through a bridge rectifier and filtered with two 2200uF capacitors. A 7805 voltage regulator generates the 5V supply for the microprocessor, while the supply for the opamp and power amplifier is regulated with a transistor and zener diode for the positive and negative rail. Nothing fancy here :-) The construction uses BD911/BD912 transistors in the power supply, but these are not critical (just what I had at hand), so any power transistor which is able to dissipate 15W-20W should do, just make sure the pinout is the same.
NOTE: As described above, the input transformer is 2x15Vac on the secodary side. 2x18V or even higher are NOT supported without changes to the schematic!
Microprocessor controlled sinus generator, the DAC and filter
The sinus generator is implemented as a Microchip PIC microcontroller and a simple resistor Digital to Analogue converter (DAC). The construction uses a simple 6 step resistor DAC to form a crude sinus, which is filtered to make an acceptable sinus. The filter has a -3dB frequency of 338Hz which was selected to allow for speeds exceeding 100 rpm for old records (e.g. 120 rpm will output a 181.82Hz sinus when using the 33 rpm pulley). However, for even better filtering, a frequency of 169Hz can be implemented, by replacing C4 with a 1uF capacitor in place of the default 470nF, which will still allow 78 rpm without any problems.
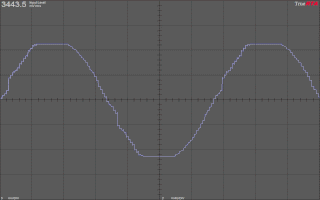
Figure 1 - Unfiltered DAC output (45 rpm)
Taking a look at the signal that comes from the DAC, we see the raw unfiltered output in figure 1. This output is from the prototype using 5% resistors. The big vertical steps comes from the use of an uneven resistor series, while the overshots in the picture is due to the "measurement equipment" (sound card used as oscilloscope for making the pictures). Another note about the pictures - the prototype was running a 12 MHz crystal (in place of a 20MHz) so the time scale is not correct!
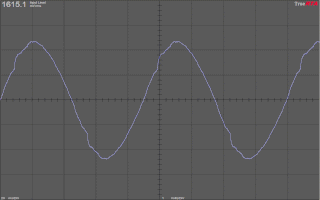
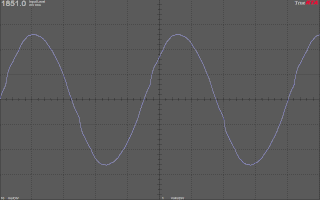
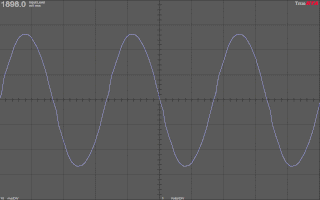
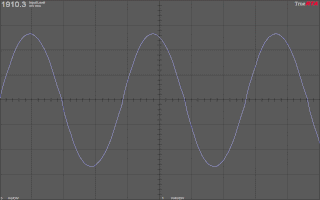
In figure 2 to 5, we see the filtered output at 16, 33, 45, and 78 rpm (all on the 45 rpm pulley, with a 12MHz crystal). If playing 16 rpm records is of essence, change the filter to a 169Hz one as noted above and/or use the 33 rpm pulley - both these measures will improve the sinus at 16 rpm. If using strictly 33 and 45 rpm records, it is also adviceable to change the filter capacitor to make the sinus cleaner. Finally, using the 1% resistor series will also improve matters as seen in the pictures below.
It should be noted, that these measurements are all made with the filter applied directly after the DAC and before the gain stage, power amplifier and before the output transformer - the transformer itself acts as a filter, which further improves the waveform.
Note: The DAC can be implemented with two different resistor series - one using 5% resistors (easy to get, cheap) and one using 1% resistors. Both series has been tested, so that no combination of resistors within their stated tolerances causes a voltage reversal at any step in the DAC.
Gain stage and power amplifier
The gain is handled by an opamp which is set to 4.5x gain. This will result in an output voltage (after the output transformer) of approx. 170V or 85V. R14 provides the "gain control" which raises the gain to approx 6.0x (as the microcontroller is unable to take R14 down to true ground) which results in approximately 230V/120V. If you want to make this contruction without the "reduced speed" option, just leave out R14 and replace R11 with an 1.8K resistor. From software v1.3, it is also possible to select "always" high voltage even when R14 is mounted and bypass the reduced speed in this way.
The power amplifier is a true class B design, which the negative feedback takes care of the crossover distortion. This type of amplifier measures very well on sinus signals, but is ridden with intermodulation distortion and a real "anti-hifi" scare. However, for this use, where it is fed with a sinus all the time, it should be more or less perfect :-). After the amplification, the output is fed to the secondary of the output transformer, which is simply a 230V/12V or 120V/12V transformer.
Resistor options
| 5% | 1% | 5%* | |
|---|---|---|---|
| R1 | 150k | 162k | 150k+10k |
| R2 | 82k | 80k6 | 47k+33k |
| R3 | 39k | 40k2 | 39k+1k |
| R4 | 18k | 20k0 | 10k+10k |
| R5 | 8k2 | 10k0 | 10k |
| R6 | 3k9 | 4k99 | 4k7+330ohm |
* The 5% table in the last column has been suggested by Xto Garcia. To use these values, make the combined resistor by soldering the resistors in series before mounting them on the PCB.
PCB
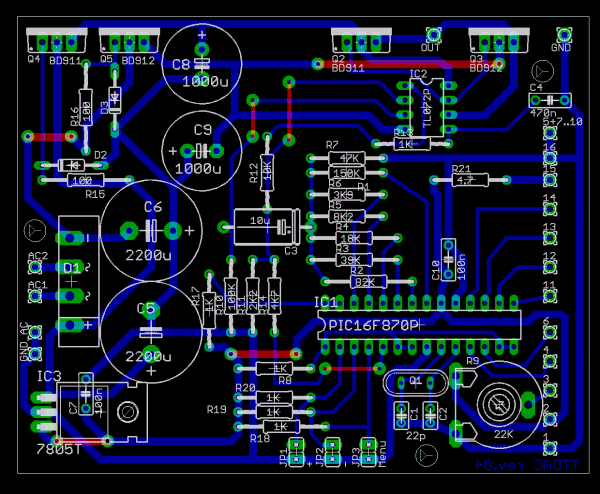
The PCB is laid out as a single sided board, so it is easy to make at home. All power transistors are mounted at the same edge, so they can be mounted on the enclosure (if using a metal enclosure) or the same heatsink, as appropriate. As only a small amount of power is dissipated by the power transistors, the heatsinks does not need to be big - a heat sink with an area of 6x5 cm. and with 1.5 cm fins, for each set of transistors, are fine. Alternatively, any all metal enclosure, where you can fit the two transformers, the PCB, and everything else, will be large enough as the cooling area for all 4 transistors. All transistors must be isolated from the heatsink or enclosure! The 7805 (which is shown as laying down on the PCB - it is NOT) should be cooled with one or two small heatsinks meant for TO220 - if you need 1 or 2 depends on the display you are using (different background colors draws different currents).
Note: The text above is correct, but only when the input transformer is 2x15Vac on the secondary side. If a 2x18Vac is used, the transistors will become VERY hot and possibly burn out.
Note: Use the "Eagle Layout Editor" files at the bottom, to print out the actual PCB.
Parts list for the PCB
Resistors (all 0.25W, 5%)
R1 - 150k* R10 - 100k R18 - 1k0 R2 - 82k* R11 - 2k2 R19 - 1k0 R3 - 39k* R12 - 10k R20 - 1k0 R4 - 18k* R13 - 1k0 R21 - 4.7 R5 - 8k2* R14 - 4k7 R6 - 3k9* R15 - 100 R7 - 47k R16 - 100 R8 - 1k0 R17 - 1k0 R9 - 22k trimpot
Capacitors
C1 - 22p        C7  - 100n
C2 - 22p        C8  - 1000u/35V
C3 - 10u        C9  - 1000u/35V
C4 - 470n       C10 - 100n
C5 - 2200u/40V
C6 - 2200u/40V
Semiconductors
D1 - RS607         IC1 - PIC16F883 or PIC16F870
D2 - BZX79C18      IC2 - TL072P
D3 - BZX79C18      IC3 - 7805L (1A)

Q2 - BD911         Q4 - BD911
Q3 - BD912         Q5 - BD912
Miscellaneous
Q1 - XTAL 20MHz  (12MHz or 24MHz for 60Hz mains)

28pin narrow IC socket for IC1

1 or 2 TO-220 heatsinks for 7805L
Heatsinks for BD911/BD912 as described in the text above, if chassis cooling is not an option.
Notes about XTAL selection and PCB parts
XTAL
For mains with 50Hz frequency, use a 20MHz XTAL. For 60Hz mains you must use a 12MHz XTAL and the appropriate program for the microcontroller. For the adventurous, you can try to overclock the microcontroller using a 24Mhz XTAL and the appropriate program. The reason for providing two options are, that the sinus produced with a 12MHz XTAL is more course than at 20Mhz to provide the same adjustment resolution (0.1%). However, by overclocking the PIC microcontroller, a finer sinus can be generated. I would assume that almost all 16F870/16F883 (but I have not tested any) will be able to run at 24MHz, but if you want to play it safe, then you should use a 12MHz XTAL!
Resistors R1-R6
Please see the section about resistors above.
Other PCB parts
D1 can be replaced with a diode bridge with similar specifications, but note the orientation of the replaced part.
R9 can be replaced by a normal trimpot with any value between 10k and 100k, but please note the orientation of the trimpot on the PCB.
Populating the PCB
- Start by soldering in the 7 wires. Note that 4 of them are using thicker wire than the other 3. The thick wire are used for the supply rails and for ground, so please use a fairly thick wire for these connections.
- Solder in all small height components, i.e. the resistors and the diodes, followed by IC2 (TL072) and the socket for IC1.
- Solder in the small capacitors (C1,C2,C4, C7, and C10) and the trimpot (R9).
- Add the transistors, the voltage regulator (note: the voltage regulator must be standing - not laying down as indicated on the board!), the bridge rectifier and the remaining capacitors.
- Program the microcontroller with one of the HEX files below and mount the microcontroller in the socket.
Mounting the construction in an enclosure
Parts needed
- An enclosure (plastic or metal - please see warning near the top of this page) which is big enough to house the PCB, transformers, connectors etc.
- 3 momentary pushbuttons. JP1 is "-" or "down", JP2 is "+" or "up" and JP3 is "Start/Stop/Menu". Note: + and - for JP1 and JP2 is mixed up on the schematic and PCB.
- 1 ON/OFF switch capable of carrying 250V/125V for the mains switch.
- One IEC inlet filter (please select the appropriate model for your country - i.e. in countries without an earth terminal, choose an inlet without filter connection to the earth or the enclosure could carry lethal voltages in case you use a metal enclosure).
- One outlet plug which is appropriate for your country (or for the turntable in case this is different :-).
- One panel mount fuse holder (this is essential - do NOT leave out this part).
- An input tranformer of 230V/2x15V 20W or 120V/2x15V 20W. Do NOT use another transformer like 2x18V!
- An output transformer 230V/12V 20W or 120V/12V 20W.
- A 1601 type display (16x1 character LCD display, standard type). The correct display is identified by the number 1601 in the type number, e.g. WH1601A for a Winstar display, PC1601LRS for a Powertip display etc. You can use one with backlight or without backlight - it's up to you, but normally you'll want to get a display with backlight.
- Wires, screws, transistor mounting materials (screws, isolator, washers) as needed.
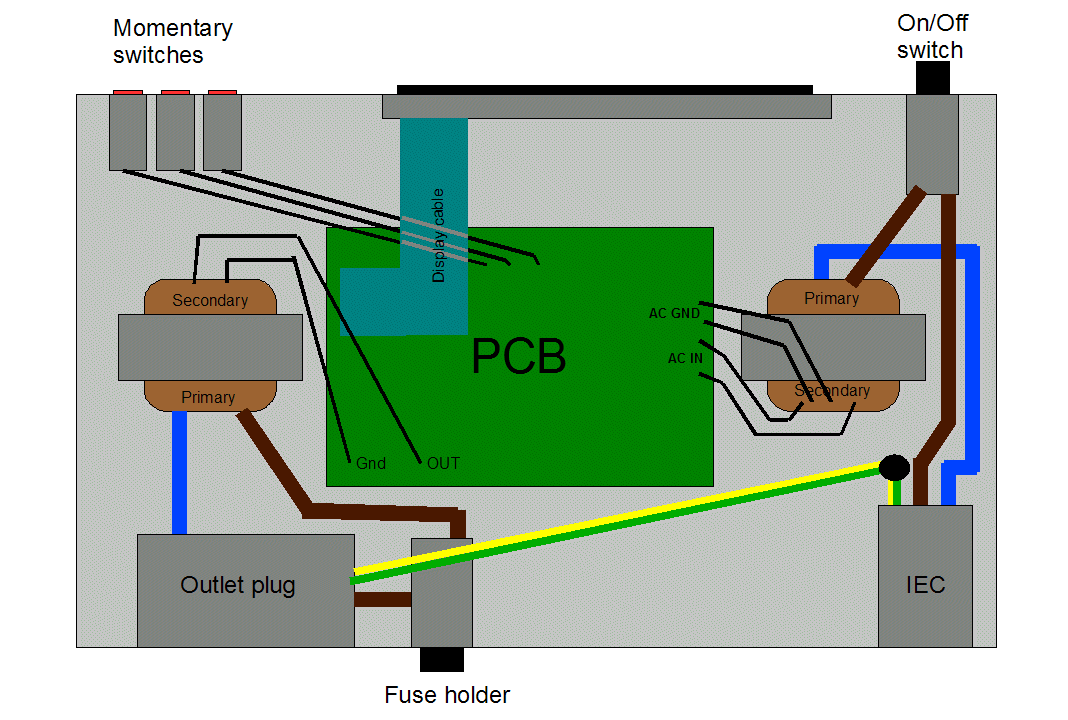
Wiring diagram overview for enclosure. Note: The momentary switches needs two wires each!
Downloads
Note: All the files are copyright ©2006-2024 by Johnny Norre and/or DuNo Electronics I/S, but can freely be used for making a personal version.
Eagle layout editor files:
These files are compatible with the "freeware" version (https://www.autodesk.com/products/eagle/free-download) - just download it and open the files below (or at least the PCB file to print out the PCB).
Gerber files:
As Autodesk will discontinue "Eagle CAD" from June 7 2026 and forward and there are no words regarding the availability after that date, here is the gerber files generated by "Eagle CAD".
Assembler files (v1.3):
You can download these files, if you want to see how the program is made or if you want to make your own changes/additions. Note: Modifying or changing the files does not remove the original copyright of these files!
Microchip MPLAB compatible source code
Hex files (v1.3) for PIC16F883:
These are the precompiled files, ready to be programmed onto the PIC16F883 controller. You only need one of these files!
50 Hz output (20MHz xtal, 16F883)
60 Hz output (12MHz xtal, 16F883)
60 Hz output (24MHz xtal, 16F883)
Hex files (v1.3) for PIC16F870:
These are the precompiled files, ready to be programmed onto the PIC16F870 controller. You only need one of these files!
50 Hz output (20MHz xtal, 16F870)
Possible improvements in a future v2 of the TTPSU
One or more of the following ideas could be considered, if a version 2 was designed in the future.
- Use a PIC 18F series microcontroller, to get a better sinus (using 7 bit DAC and the higher speed of the PIC 18F).
- Use a PIC 16F or PIC18F with DAC output built in (an option added to a few new PIC processors after this project was thought out)
- The ability for the TTPSU to keep track of how long time the motor has been turned on as a rough estimate of for how much hours the current pickup has been used.
- Like the current TTPSU has two speeds via. the gain control, v2 could include two filters (controlled by the microcontroller) to improve the sinus at low speeds (16 rpm and 33 rpm).
- Adjustable high and low voltage to control the optimal startup speed or the optimal running speed.
- Voltage ranges for induction motors (Garrard, TD124 and the like).
- Output transformerless design with high voltages directly from the construction (would require modification to the turntable).
Tools used during development of TTPSU
The following equipment has been used during the development of the TTPSU:
- IDL-800 Digital Lab (www.kandh.com.tw) for prototyping/breadboarding
- Delphi (www.embarcadero.com) for calculating optimal resistor series for the DAC and tolerance testing.
- Tina (www.tina.com) for simulation of analogue sub circuits.
- Eagle Layout Editor (www.autodesk.com) for schematics and PCB layout.
- Microchip PICKit1 with signal analysis doughter board (www.microchip.com) for testing.
- Microchip MPLAB IDE v7.3x (and newer) for microcontroller program development.
- TrueRTA (www.trueaudio.com) for testing and for making the oscilloscope pictures on this page.
- Gould/Advance OS3000 oscilloscope for testing.
- Various multimeters, books and datasheets.
- QL200 PIC Development board.
- MPLAB ICD 2 and ICD 3.
How to use it
How does it sound, then?
Well, originally I thought that it would sound the same as when the turntable was connected directly to the mains. However, after reading reports of various "Lingo's" and "Valhalla's" superior sound, I hoped that the TTPSU could lead to some improvement in sound. And actually, it does improve the sound (disclaimer: I constructed the gizmo and built it, so maybe I want it to sound better :-)! The sound image becomes more precise, making it easier to pinpoint the performers in the sound image. The bass tightens and the sound seems more focused and silent. Seeking an explanition for these observations, I must point these improvements to the double isolation from the (somewhat noisy) mains - the input filter in the IEC inlet, the input transformer and power supply filtration and the generation of the new mains output, effectively isolates the turntable from the mains supplied to the contruction. Maybe the sinus period is a little more precise than from the mains (I use a 50 ppm xtal), which could contribute to the overall sound? I don't know, but I think it actually improves the sound from the 2 different tables I've tried it on (a Heybrook TT2 and a Rega Planar 2). Please send me you observations, so I can add them here!
Comments, requests for new features, bugs or problems – write me at johnnynorre@gmail.com.